After making selections and pressing ENTER,
Printing Journal Data will display.
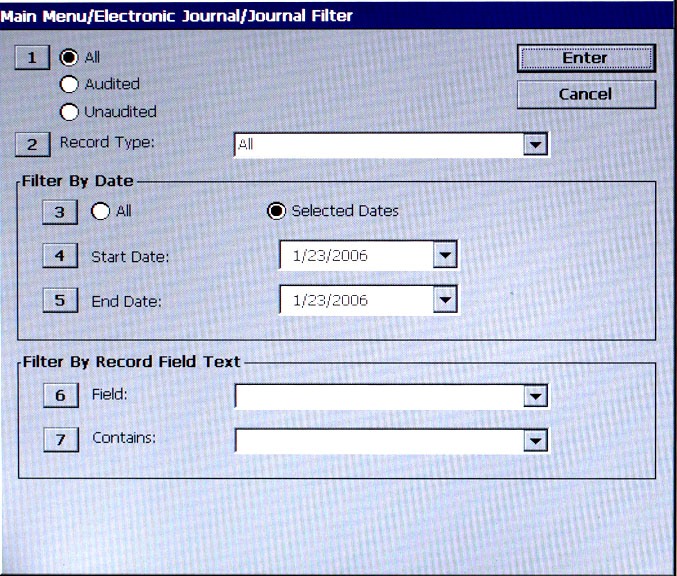
DISPLAY SELECTED RECORDS allows you to perform the following functions:
1 All: Audited/Unaudited. Select the category of records to consider: all records, all audited records,or all unaudited records.
2 Record Type. Select the type of journal record to view: All, transaction, text record, cassette close, day close, or parameter change.
Filter By Date:
3 All/Selected Dates. Select the date range to use for the management report: all dates, or selected dates. If selected dates is selected, specify the start date and end date.
4 Start Date. Specify the starting date for the range of journal records to consider. When selected, a date-entry dialog appears. Type the date in the format MMDDYYYY. Use the arrow key to toggle between the Month, Day, and Year fields. Press ENTER to accept it.
5 End Date. Specify the ending date for the range of journal records to consider. When selected, a date-entry dialog appears. Type the date in the format MMDDYYYY. Use the arrow key to toggle between the Month, Day, and Year fields. Press ENTER to accept it.
Filter By Record Field Text:
6 Field. To see only those records that match a certain field criteria, select the applicable field here. The field types available to select will be determined by the current record type (see Record Type above).
7 Contains. When this button is selected, a text-entry dialog appears. Enter a text string to define your search. Only those records that contain the text string will be returned in the management report. This function is only applicable to the text record.